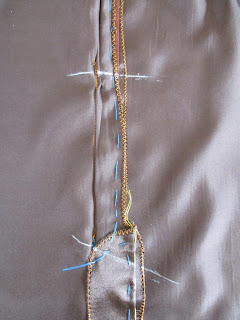
First, baste (yellow thread) along internal edge of the fusible interfacing, as shown in the pictures below. Please Note: Click on photo to see a larges size.
Then take a piece of heavy paper. Then place a piece of heavy paper in the middle of the skirt. Then pin both back vent extensions together. Then pin both center back seam allowances and the right back panel together. Please Note: If the heavy paper is not covering all the skirt completely, then place heavy paper in one area, pin that area and then move heavy paper to the next area.
View from the outside of the skirt.
Then baste (blue thread), then remove pins.
Then turn your skirt right side out. Then take a piece of heavy paper again. Then place a piece of heavy paper in the middle of the skirt. Then use red dressmaker's pins and mark the diagonal line along the top of the vent. Then use white dressmaker's pins and mark the horizontal line along the bottom of the zipper opening.
Then transfer diagonal and horizontal lines from the right side to the wrong side, use ruler and a sliver of soap, then remove pins.
Then baste (red thread) along the white lines.
View from the outside of the skirt.
Then use a sewing machine and sew the diagonal line of the stitches on the right side of the skirt along the top of the vent, sew along red thread. This will be the nice finished look at the top of the vent.
Then sew the line of the stitches across the bottom of the zipper opening, sew along red thread. Then remove any basting thread from the vent area and zipper area, and pull the sewing threads to the inside. Then place your skirt on your ironing board and press the center back seam, bottom of zipper opening and vent area from the wrong side, use a moisture press cloth.
View from the inside of the skirt.


No comments:
Post a Comment